
Learning to tune your violin on your own is a huge milestone for every growing string player. While it might feel frustrating or a bit intimidating at first, it gets much easier with practice!
Here is a simple, step-by-step guide to help you keep your violin sounding its best.
The Core Principles of Tuning
Before adjusting anything, remember two basic principles:
- Pitch is too flat (low): Tighten the string to raise the pitch.
- Pitch is too sharp (high): Loosen the string to lower the pitch.
Using Fine Tuners vs. Pegs
Your violin has two tools for adjusting pitch
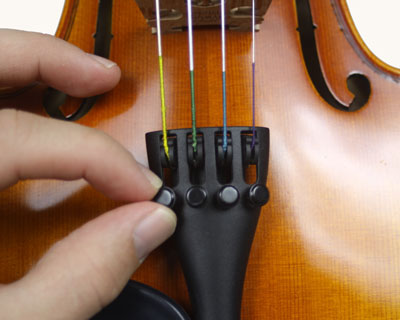
Fine Tuners (Small Adjustments)
Located on the tailpiece, fine tuners are used for small pitch corrections.
- Raise Pitch (Tighten): Turn the fine tuner clockwise.
- Lower Pitch (Loosen): Turn the fine tuner counter-clockwise.
Tuning Pegs (Large Adjustments)
Located in the pegbox at the top of the scroll, pegs are used for major pitch shifts.
- Raise Pitch (Tighten): Turn the peg forward (away from you).
- Lower Pitch (Loosen): Turn the peg back (toward you).
Important Peg Tip: Standard pegs stay in place purely through friction. Push the peg gently inward toward the pegbox while turning so it doesn't slip back out of place. Always turn pegs in tiny increments—especially on smaller instruments—as a small turn dramatically alters the pitch!
Most beginner instruments have fine tuners on all four strings. However, you may find that your instrument only has a fine tuner on the E string. This is because the E string is usually made of a thinner, higher tension piece of metal, making it incredibly hard to make tiny pitch changes with the peg.
Methods for Tuning Your Strings
Method A: Using Your Ear & Reference Pitches
Tune by comparing your instrument's pitch to a reference tone.
- Start with the A string: Play a reference "A" pitch (from a piano, pitch pipe, tuning fork, or metronome drone).
- Compare: Pluck your A string lightly and listen to see if your note sounds higher or lower than the reference.
- Adjust: Tighten or loosen the string until your pitch matches.
- Tune remaining strings: Tune your D string, then G string, and finally E string against reference pitches or by playing "fifths" (listening to the intervals between adjacent open strings together).
- Unsure if you're high or low? Try singing the note out loud, or intentionally loosen the string slightly so you know for sure that you need to tune back up.
Method B: Using a Chromatic Tuner or App
A chromatic tuner visually indicates where your pitch sits.
- Needle moves to the Left: The pitch is too low/flat (tighten the string).
- Needle moves to the Right: The pitch is too high/sharp (loosen the string).
- Needle rests in the Center: Your string is perfectly in tune!
Recommended Tuner Apps
If you want to tune using your smartphone, here are three fantastic tuner app options to download:
- Piascore Tuner Lite
- Smart Metronome & Tuner (by Tomohiro Ihara) — Includes both tuner and metronome capabilities!
- Tuner T1
Quick Tips for Beginners
- Add Fine Tuners: If using pegs feels overwhelming, consider adding fine tuners to all four strings.
- Tune Lightly: Applying lots of pressure to the string with your bow while tuning can physically deform the string, altering the pitch. To get as accurate of a sound as possible, tune very quietly, tilt your ear towards the f-holes, and listen carefully!